Friday, April 15, 2011

Soapmaking Day 4

By Eve Donnelly
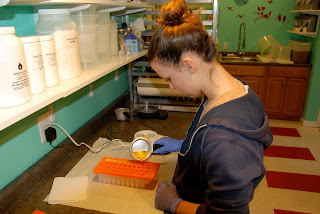
Today was my last day of the internship.  I took my soap of of the mold and it looks really good!! Not like anything we expected but good! After I cut my soap, I dusted some gold mica dust on top. I must admit it is quite girly looking but I love it!  

When Ellen wants to create a new kind of soap she tests out smells in small amounts of essential oils. We tested many smells today and with Dave’s help she decided on one of them: a gardener’s soap. After she decided on the smell, we made that batch of this new soap along with two other soaps. The last thing that I did today was learn how to put figures into a database that helps keep track of how many soaps there are left, how many were sold, what materials are running low and need to be replenished.

I have enjoyed this experience from the start to the end. I would definitely love to work with Ellen again and to make more soap!!

Soapmaking Day 3

By Eve Donnelly

Today I got to make my own soap!


I made a grapefruit scented soap that’s yellow with pink swirls. I had to use two containers in order to use two colors.


I had to line my mold with freezer paper which is what Ellen did for many years before she got reusable ones. I began to make the soap. First I mixed the oils and then I added the lye water. I next poured a small amount of the mixture into another container and added pink clay so that I would get a pink color. I added the grapefruit essential oils to the larger container and began to mix it.


As soon the trace began to appear on the top of both mixtures, I swirled the soap with the pink clay in it into the larger container which I then poured into my mold. I covered it and let it sit. We also made whipped shea butter today and packaged it in small containers.

Soapmaking Day 2

By Eve Donnelly
Today we took the soaps out of the molds and cut them. It’s really exciting to see what the inside designs of the soap will look like. I used a “log cutter”  and cut into bars with what looked like a large hard-boiled egg cutter.


After I cut the soap and put the bars on the racks to dry, we began to make lip balms. We melted oils specifically used to make lip balm and put essential oils in. I then poured the melted mixture into the molds.  

While they cooled, we put together a few gift basket orders, wrapped and packaged them by hand and got them ready to be shipped. When the lip balms had cooled, I capped them and put labels on them.

Soapmaking with Ellen April Handcrafted Soap

By Eve Donnelly
For my artisan internship, I worked with Ellen Watson, a woman who started a small business of making luxurious handmade soaps. She works out of the workshop that she and her husband Dave built in the garage of their beautiful house. The name of her business is Ellen April Handcrafted Soap.
When Ellen first began to make soap, she did a lot of research. It was almost one year before she made her first batch. She has now been making soap for nine years. She sells her soaps and other products (lip balms, creams, body and room sprays) at local farmers markets (including the Phoenixville Farmers' Market) and ships packages out as well. She is as green as possible in her business by using recyclable and reusable bottles, recycled paper bags, reusable liners for the soap mold, and soy ink for her business cards. She also uses wind power throughout her house and in her workshop.
DAY 1
Today was the first day of my internship. It was so much fun! In the morning we measured oils in preparation for making soap. We used soft oils (i.e. olive oil) and hard oils (i.e. coconut oil). Ellen uses the cold process to make soap using colds oils and cold lye water (which was made ahead of time). I learned that in the winter time when she goes to market, all of her soaps are wrapped by hand. In the summer they are put into bags with labels. After measuring oils, I labeled these bags while Ellen created the different labels on her computer. After lunch, we began to make soap. We made three batches: buttermilk honey, snow on cedar and a trial batch of orange. She seems to have hundreds of essential oils of every scent and lots of clays and oxides for coloring the soap. We mixed all of the oils together and then she added the lye water. As soon as she put it in the mixture, I noticed that the bottom began to appear milky. We added the essential oils which reacted with the lye water and sped up the process of the soap thickening. You will know the soap is ready to be poured into the mold when you dribble some of the mixture over the rest and it stays on top of it like a little ridge. This is called the trace. Next, Ellen poured the soap into the mold and we covered it. The soap has to sit for a while to go through the process of saponification, so after we had finished making the soaps and cleaned up, I made lavender bags that you can put in with your clothes in the dryer while Ellen input data into the computer and answered orders.

Tuesday, April 12, 2011

Saint Peter's Bakery

By Ariel Gallegos

I've been able to make and try so many things at Saint Peter's Bakery. I've helped make breads, I've made and decorated cookies, I've made pear and apple pies, helped make cinnamon buns and croissants, and have been able to make sugar flowers.


Here are some finished sugar flowers.


I've also tried serving and it was hectic to say the least. The bakery has been able to keep their business growing by offering lunches and selling at markets. Though they don't advertise much, Melanie has been interviewed in magazines and newspapers and they always count on word of mouth.

The atmosphere in the bakery is warm and most of the customers who walk in the door are regulars and have gotten to know Melanie and her team of creative chefs quite well. The women there are very friendly and they love what they do. Most of them started out wanting to go into a different field of work when they were in college but found their love for baking and ran with it.

 Here is the dough for the Easter cookies.

Here are the decorated Easter cookies.

Most, if not all the baked good made at the bakery are made into dough, shaped, then frozen till they are ready to restock. No matter if the dough is made on a different day the goods are always freshly baked and always delicious. 

Sweetwater Bakery - Wholesome Ingredients

By Julia Lipkowitz

Today we once again rolled, baked, and packaged cookies, and bread was formed and set aside.


It was a short day, ending at 11am, as the villagers had a meeting. As this is a very short entry, I will describe the ingredients that are used in the products at Sweetwater Bakery. All of the ingredients are organic and natural, and even though they use white flour for some of the products, it is unbleached and keeps the wheat germ. The whole grain flours used are ground fresh, and the salt is unrefined. Also, they use a combination of sugar and rapadura sugar, which is completely unrefined.

Last Day at Sweetwater Bakery

In the last day at Sweetwater Bakery, we baked and packaged the bread like on Tuesday, and were done by noon. This week was fun and very interesting, as I loved baking before as well as Sweetwater’s products. The internship gave me a different perspective, as I got to see how all of the products were created and what systems were used to organize them. The only challenge I had was having the pressure of knowing that what I did would affect someone else’s business, but that kept me determined to be as helpful as possible. It was such an incredible experience that I’m seriously considering having a summer job at the bakery. In all, this practicum was educating and opened the door to many great opportunities in the future.

Julia Lipkowitz

Sweetwater Bakery - Learning to use the Cookie Oven

By Julia Lipkowitz

This morning we only rolled and packaged cookies, and learned how to use the cookie oven. Soon we were in charge of loading the oven and taking the finished cookies out in time.

One of the ovens at Sweetwater Baking Co.
  
The finished cookies.
In the afternoon, we weighed the right amounts of the different types of flours for the separate batches of bread. Different amounts of white, whole wheat, and sometimes spelt and rye flour were measured out. Then, we measured out the salt, as well as the seeds, nuts, and raisins.

Sweetwater Bakery - Baking Bread!

Today was the big bread baking day, as the bread is delivered fresh in the afternoon. All morning we helped to put the bread in and take it out when it was ready. After letting each batch cool, we put each loaf into a plastic bag with a slip of paper which said what kind of bread it was and what ingredients were used.We also mixed together the dry ingredients for the cookies which would be made the next day. After all of the bread was packaged, we went home for the day, at noon.


Bread dough.


Here is Dane working with the dough.


 Baked bread on the racks.


The final product - packaged bread!


Julia Lipkowitz

Sweetwater Bakery Day 1

My name is Julia Lipkowitz, and for my Artisan Practicum, I decided to work in a bakery. I picked Sweetwater Bakery as my host site. They make many types of breads, cookies, and granola. These products can be bought locally at the Kimberton Whole Foods, and the bread is served with lunch every Wednesday at Kimberton Waldorf School. Sweetwater Bakery is located on the campus of  Camphill Kimberton Hills. A large amount of the workforce at the bakery is made up of the villagers who live there. The two main bakers are Saul and Dane. There are also a few others that come at different times of the day.


Here is Dane (right).

Last night, I came in from 7:30pm to 9pm to see the mixing of the bread dough. Before we came, tubs had been already filled with different amounts of water, depending on the type of bread. Also, different amounts of bread starter were placed in the tubs. Jonathan Liss (who also decided to do his practicum at the Bakery) and I were instructed to fill each tub with the correct amount of flour. Then, we mixed the dough by hand, starting at the bottom then incorporating everything together. After a little while, we stretched the dough to activate the gluten, again by hand. After cleaning up, we went home for the night.

The next morning we arrived at 8:30am, and started rolling cookies and putting them on to pans to bake.

 Cookie dough on the trays ready to be baked.

I also spread granola into pans and rolled formed dough into flour and put them into baskets. The bread dough had risen over night and was formed into different shapes depending on the type of bread. Then, after being put into baskets and pans, they were rolled away to another room to sit. The cookies were baked. Then, after they cooled, we packaged them using a scale to weigh the right amount. We had a lunch break from noon until 2:30pm. In the afternoon, we cleaned the windows and racks and mopped the floor. We worked until 5pm.

Warli Paintings 2

By Chaitanya Bhat

The Project: Part 3
Today, I asked Madhukar the artisan more about the business aspect of his work.

When did your art become commercial? It took me 8 years to master technique, positioning, understanding the themes such as holi, Diwali,Savri,(puja-worship of indian Gods), Waghdev (a festival for the tiger god) and the narratives (katha) aspect (Ramayana).

Where do your orders come from? Shri Madhukar Janu Kharpade registered with the Panchayat Samiti (the District Body) which keeps him abreast with the calendar of events such as art exhibitions and workshops at various levels. He enrolled and participated in many such annual events (about 3-4 per year), where he established contact with the visitors (art connoisseurs, art dealers, middlemen, interior designers). This is how the orders started to trickle in from these events. This trickle grew into a steady flow, keeping him busy the whole year in executing these orders.


Were is your "studio"?  What do you mean by studio? I paint in the serene undisturbed atmosphere of the village nestled in the undulating hills of Sakharsheth village in the Jawahar taluka (180 km from Mumbai). But occasionally I travel to different, more urban locales to decorate and paint walls.


How much do you charge for the different works and when do you get paid? For canvas as a medium, this is his scheme. For an individual, detailed canvas piece, I charge 800 rupees per square foot. For an order of more than 100 pieces, I charge 500 rupees per square foot. For light colored t-shirts of all sizes, my rates range from 200-500 rupees. For a dark colored background, I charge 100 rupees more. Bulk rates are negotiable. For Saris, I charge 1500 for light colored and 2000 for dark colored. For double bedsheets, I charge 1000 for light colored and 1200 for dark. For single bedsheets, it is 700 for light and 800 for dark. Dupattas are 250 for light and 300 for dark. Punjabi tops have the same pricing as the t-shirts.
For mud Pots, the range goes from 50 for small pots which a finger won't fit inside to 1000 rupees for the pots where a small child can hide inside of. I charge 600 rupees per square foot for a wall (2x3),I charge another 200 rupees to prepare the wall for painting. As an up-and-coming artist, I earned only 20,000 rupees to paint a 16x10 wall in an upmarket store (Ethnicity). Last year, I earned 44,000 rupees to paint a 5x11 wall in a government office. For greeting cards, the prices range from 20-50 depending on the size. For coasters, he charges 30. For a pen and cell phone remote stand, he charges 15. For all orders, he takes an advance payment of 40% and the rest upon completion.


How much will you charge us in the US to paint a wall in our school? I am excited to come and showcase my talents in the USA and decorate your lives. I don't know the pricing yet.


When you get an order, what process do you go through to do the painting? When I get an order for a canvas painting, if the customer so desires, I give them a quotation which is approved by the client, then I negotiate the rate and the finishing time with the customer. If the client wants a written contract I enter into one, otherwise it's all oral and is based on simple trust and faith. I take the 40% advance in cash which I use for either the painting supplies or the painting supplies as well as the raw materials. The first step is cutting the materials into the size required by the customer if it is canvas. My wife helps with cutting the fabric. Then the painting area is marked by demarcating a 2-inch border around the painting surface. The surface is then given a first coating of shen (cow dung) or geru (red mud) and dried. Another coat is applied and dried. This process is completed for all pieces of canvas before the actual painting work can begin. When the customer is deciding on the painting, I show samples of different themes. If the customer selects one of these samples, then the work is easy and needs no trial piece. If the client wants a new design, then usually there is one trial piece done to get the design down. Then when the painting is going on, I usually paint the shapes and my wife colors in the figures.

 
Has any of your orders shipped internationally?  Not through me directly but through other people who organize it. If the person can carry it in their luggage, then there's no problem. Otherwise the best means for shipping is to send it either via courier or the post, inside a round, circular tube designed to carry pieces of artwork.

What is your ultimate goal for your work? My work is very erratic, sometimes I make nothing but then other months I make around 10,000 rupees. I want to expand by opening a showroom in Jawar. I want to earn money for my family and make a name for myself. I have also taught workshops in my village and I have found some young artists who could be included in the business.
 
 
The Project: Part 4
As I finished up the week, we decided to simulate the actual process of an order, because he didn't have one at the time. So we ordered greeting cards and two canvas drawings. I filled in the drawings and Madhukar did the original drawing of the shapes. This week has been a real experience for me and I will cherish it forever.

Thursday, April 7, 2011

Warli Painting

By Chaitanya Bhat

The Project: Part 1

I feel that the whole day is an experience so I will share all of it. I have traveled to India for my artisan practicum. I will be working with an artisan who specializes in Warli paintings. Today, we left my uncle's house at about 8 in the morning and then because of our compulsion to always forget something, we had to go back to my uncle's house to get it. We got to the place where we were staying for the week and met the artisan and the person who would be our photographer. Then we went to a village to learn about the history of Warli painting. There we met a painter who talked about his work. We spent the next day at his village with the villagers and learned a little bit about their culture. I learned the basics of Warli painting and got to witness an amazing tribal dance. 

Here I am (left) in the village.
My mother, who traveled with me, is on the far right.

Here I am pointing at a Warli painting.

The Project: Part 2
Today I asked the artisan a few questions about what he does.

How did the word Warli come about?  The word Warli came about this way. During the reign Chatrapati Shivaji, there was a war. Many communities lost their men-folk, leaving behind widows and orphans. These survivors of the deceased (warle-dead) became to be known as the warli community, confined largely to the tribal areas of Gujrat and Maharasthra. These communities are not far from Mumbai- the Urbs Prima. The paradox could not be more glaring between Mumbai and the communities.


These are traditional Warli paintings.

Here, I am learning about significance of Warli paintings.


I am playing a traditional Indian instrument.
The musician is playing it in the picture below.


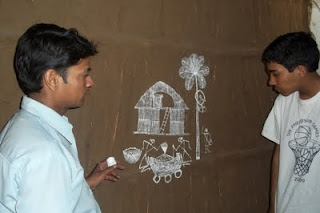
How did the painting originate and how did it get the name of Warli?  The poor simple tribals built their homes with the natural materials abundantly available in the forest. Reeds of the karvi plants and residual stalks of grain were used. They were tied together by the bark of trees or creepers as ropes. This screen was plastered with cow dung and mud to create the walls of the house. On festive occasions these people felt like decorating these walls, but they had no access to pigments, colors, paints and brushes so they did the obvious. They used a paste of rice flour (staple food) as a paint and bamboo sticks as brushes and began painting simple motifs of village life-birds, animals, activities, festivals, rituals, the cycle of birth, life and death, the cycle of seasons and the farming cycles. The effect is stunning. You can't imagine the stark contrast and how the painting works with the background when you see a dark brown or red surface, in dark interiors, with white figures on it. It's really amazing.

They depicted the human figures using triangles (for the body), circles (for the head) and lines (for the arms, legs and actions.). These were all drawn freehand, no rulers or compasses required. The artist doesn't even sketch an outline first. He just dips the bamboo stick into the rice paste and draws on the wall. Urban India began to take notice of this traditional art form, resulting in a steady influx of students, researchers and artists flocking to these villages to learn, research and document their work. About half a century ago, Shri Jiva Soma Mhase was confronted with the question, "what is the name of this art?" and his  spontaneous, obvious response was "Warli," since it originates from the Warli tribe and is an inextricable part of the community. The advent of television and media earned him recognition and many awards. Last year, the Indian government honored him with a Padma Shri. His efforts convinced a lot of other artists to take up this painting as a livelihood. This led to the commercialization of the art form. These artists have travelled far and wide in India and abroad, painting and teaching as they go. These Warli paintings decorate many a home and offices of the elite all over the world.

Metalworking Practicum with Bob Bauers

I am doing a metalworking practicum with Bob Bauers. He does a bit of  everything in his shop that involves metalworking and is small. He creates metal sculpture things and sells them at art galleries. He also does commission work to make railings, tables, etc. I really enjoy working with him there. On Monday, Ben M. and I cleaned his shop and then after lunch, we went to his supplier to pick up the metal he needed for the next day.

Kaleb Murray

Pantaluna

By Helena Bader

I decided to do my practicum the second week of break instead of the week assigned so it is already finished. I worked at a business called Pantaluna which makes up-cycled clothing out of recycled t-shirts. The business consists of three people: the two founders and one employee. It is located in Frenchtown, New Jersey.

One of the new dress prototypes on a mannequin
with the signature Pantaluna wig.

There is a lot of work which goes into making each individual piece of clothing. The materials are t-shirts that are either donated or from thrift-shops, thread, and elastic. The process of making the clothing starts with ironing the shirts, cutting them out from a home made pattern, and laying these pieces out in a unique and artistic way. After that the pieces are assembled, sewn and tagged.


 Some interesting scraps of material.


 T-shirts waiting to be cut up.


The bottom hems of tons of t-shirts.
These are used to braid with for the headbands.

The scary serger sewing machine! (I did not do any sewing of clothes)

Pantaluna sells their products in the workshop as well as online and in a few other stores. The clothes are advertised in local newspapers and the brand name is trademarked. Intriguingly, the items also “advertise” themselves because they are so unique. People really notice when they see others wearing them and this can spark their interest. The clothes are wrapped in old pattern paper (also reused) and tied with a t-shirt material flower.

Finished skirts hanging up and waiting to be bought.

As far as the founders of Pantaluna can tell, no one has ever come up with an idea quite like their idea. This sets their clothes apart from other types. There is also the fact that each piece is handmade which makes them even more special. They have received some recognition in the form of articles in magazines and local newspapers.

Illia, who runs the business, was originally a painter. She went to art school and is interested in social commentary and dataism. Dataism is a form of art where a lot of the composition happens by chance and Illia managed to bring this aspect into her clothing design because the pieces of cloth for a piece are chosen merely by color, but then the random assembly of text and images create its own story. Also, by using t-shirts that were bought and worn by Americans, the clothes are representative of peoples taste and interests in this country. This is how social commentary is coordinated into her works.
       
Illia is resourceful and doesn’t like waste. She first created this type of clothing for herself out of cashmere sweaters just as a cozy thing to wear around the house. Then people began to ask her where she had bought them, and when they learned that she had made them, they asked if she could create some for them. That’s how she came to start Pantaluna about three years ago. The company has been doubling its profits annually!

Quad-braids (braids with four strands) that I made for headbands.

Finished headbands that have been sewn and tagged.

These are organized tags with skew numbers on them. Skew numbers are used to categorize products and typically consists the size and name of the piece.
Pantaluna also includes whether it is made of mainly black or colored fabric.
Example of a skew number: pl/m/bl. That means “pants-long/medium/black. Figuring out which tag to put on which article of clothing turned out to be quite confusing!

Pantaluna's products are most definitely "green" products. They keep old
t-shirts out of landfills and transform them into more clothes so that new cloth and thread and energy don’t have to be used. Pantaluna takes unwanted materials and creates new, cool clothing.

I have learned a lot during this practicum. Illia and I went over the business end of it: financing and marketing among other things. I also practiced elements of the manufacturing process. Now I really understand how much time and effort it takes to make a quality product by hand and how even things which look simple involved an unbelievable amount of behind-the-scenes prep work to create.

Here I am organizing petals for a skirt.


This is the skirt I designed which is fondly known as "the Easter skirt."

Day Two of Metal Working

Hello once again! Working with metal today was alot of fun because I used what I learned yesterday to help my supervisor put details onto a very ornate gate he has spent a few months creating. Together we bent steel and from the forge hammered out a lock to hold the gate in place. Using a plasma cutter (heated air that's so hot it becomes plasma), we cut out a square and sanded it down so that the bolt wouldn't rub up against the rough corners of the lock.


We also sanded down the rough edges of the rotative gate itself so that the opening and closing was more fluid and it took less energy to move the gate once it was out of the lock. Overall it was a very efficient day! Tomorrow I will go on a field trip to releases to pick up some more recycled steel. This is turning out to be a blast!

Mikael Mihranian